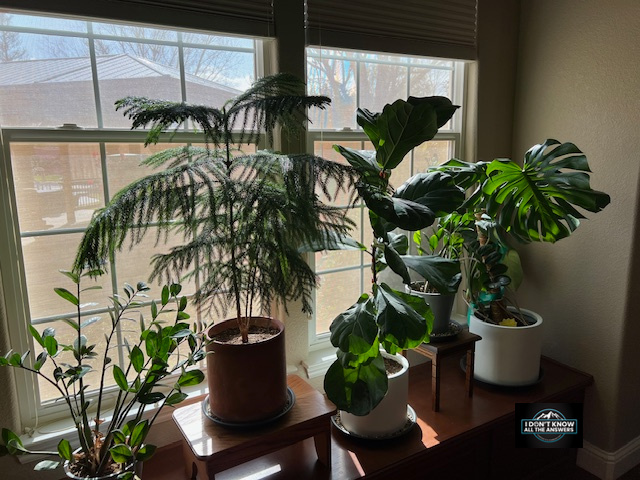
Have you ever felt the heartbreak of watching a houseplant you care so deeply for slowly wither away under your care? I know that feeling all too well. After a whirlwind year full of nonstop projects, my beloved houseplants became unintended victims of my neglect. Many didn’t make it through the chaos, but for those who survived, it’s time to breathe new life into them. Welcome to Nikki’s Houseplant ER—a series of blogs where I will take you through the ups and downs of reviving my green companions. This week, I’m tackling my resilient yet battered Norfolk Pine. Despite its sturdy nature, it has been crying out for much-needed attention (and a new pot!). I don’t just toss the plant when it is in dire straits. I try to restore its beauty, one leaf at a time.
The Norfolk Pine is a truly magnificent sight. Its graceful branches and soft, feathery needles bring a touch of nature that feels festive and serene. Whether you’re just starting your indoor gardening adventure or are a seasoned plant enthusiast, understanding the care needs of this stunning tree is the key to keeping it lush and vibrant. Here’s everything you’ll need to know to grow your Norfolk Pine confidently—backed by some personal experience. First things first, water is the lifeline for these trees. While they may seem like an evergreen that can handle a bit of neglect, overwatering or underwatering can quickly lead to their demise. To keep your Norfolk Pine happy and healthy, thoroughly water it once a week or whenever the top inch of soil feels dry. And make sure to use room-temperature water to avoid shocking the roots.
Light is also crucial for these plants. They thrive in bright, indirect light but can tolerate lower light conditions. Just be mindful not to place them too close to windows where they may be exposed to drafts or direct sunlight. A good rule of thumb is to rotate your Norfolk Pine every few weeks so all sides receive equal amounts.

Setting Up Your Norfolk Pine for Success
The Norfolk Pine might look like the quintessential Christmas tree, but it’s much more. Unlike other pine varieties, this one thrives indoors if you meet its lighting, moisture, and care needs.
Light Requirements
- Bright, Indirect Light: Place your Norfolk Pine in a spot with plenty of bright but indirect light. A location near a large window with a sheer curtain works perfectly.
- Rotate for Even Growth: Remember to rotate the pot every few weeks. This prevents your Norfolk Pine from leaning toward one side as it grows toward the light.
Soil & Watering
- Well-Draining Soil: Use a sandy, well-draining potting mix to avoid waterlogged roots. Peat-based mixes designed for houseplants are ideal.
- Consistent Moisture: Water when the top 1–2 inches of soil are dry, ensure the water drains out completely. Avoid letting the plant sit in standing water.
Humidity & Temperature
- Humidity is Key: Norfolk Pines love humidity. Mist them regularly or place their pot on a tray filled with pebbles and water to maintain moisture in the air. During the dry winter months, a humidifier can be a lifesaver.
- Perfect Temperatures: Keep the room temperature between 60 75°F (15 and 24°C). Sudden drops in temperature or exposure to drafts can cause needle browning or drop.
Fertilizing Schedule
During the growing seasons, spring and summer, feed your Norfolk Pine with a balanced houseplant fertilizer every 6-8 weeks. Be sure to follow the instructions on the label. Reduce or stop fertilizing in fall and winter, as the plant’s growth will naturally slow during these months.
Seasonal Care Tips
Norfolk Pines changes with the seasons, just like us. Here’s a quick seasonal breakdown of what they need to thrive year-round. Understanding and adapting to these changes will ensure your Norfolk Pine stays healthy and vibrant.
- Winter: This is their rest period, so keep watering minimal and protect them from cold drafts. Since indoor heating can dry the air, use a humidifier to keep them happy.
- Spring: With growth picking up, increase your watering routine and start fertilizing. Repotting is also best done now, giving the plant fresh soil for a strong growing season.
- Summer: This is prime time for their growth! Maintain consistent moisture levels, mist frequently, and shield them from direct sunlight, which can scorch their delicate needles.
- Fall: If the plant enjoys the outdoors, prepare to bring it indoors. Gradually adjust its lighting to avoid shock, and taper off the fertilizer.
Common Issues & How to Solve Them
Despite their beauty, Norfolk Pines can be dramatic when they don’t get their way. Here are some common problems and solutions to help you troubleshoot when things don’t look right.
Browning of Needle Tips
- Possible Causes: Low humidity or overwatering.
- Fix: Mist regularly and check your watering routine to ensure the soil isn’t soggy.
Yellowing or Dropping of Branches
- Possible Causes: Overwatering or poor soil drainage.
- Fix: Ensure the pot drains well and don’t water until the topsoil feels dry.
Stunted Growth
- Possible Causes: Insufficient light or nutrient deficiencies.
- Fix: Move your plant to brighter indirect light and fertilize during the growing season.
Pest Problems
- Common Pests: Spider mites and scale insects, especially in dry conditions.
- Fix: Wipe the leaves gently with a damp cloth and use neem oil to control infestations.
Root Rot
- Possible Causes: Waterlogged soil.
- Fix: Report immediately using fresh, well-draining soil and trim away any rotted roots.
Browning from Drafts
- Fix: Avoid placing your Norfolk Pine near windowsills with drafts or HVAC vents.
My Personal Experience with Norfolk Pine
My Norfolk Pine was worse for wear after the big move (aren’t we all at some point?). But after repotting it in a larger terra-cotta pot, fresh soil, and giving it the bright, cozy corner it deserved, it is doing much better. The repotting process involved gently removing the plant from its old pot, shaking off excess soil, and placing it in a larger pot with fresh, well-draining soil. I remember the joy I felt when I saw the first new growth, a sign that my efforts were paying off. Watching it recover and thrive has been a rewarding experience, reminding me why I keep filling my home with gorgeous greenery.
Caring for Your Norfolk Pine Recap
Here’s a care schedule to help you keep track of your plant’s needs.
Weekly Tasks
- Check soil moisture every 3–4 days and water when the topsoil feels dry.
- Mist the plant or maintain humidity through a tray setup.
- Rotate the pot slightly to ensure even growth.
Monthly Tasks
- Wipe down the needles to remove dust and improve light absorption.
- Inspect for pests, yellowing branches, or other signs of trouble.
Seasonal Highlights
- Fertilize during spring and summer every 6–8 weeks.
- Repot every 2–3 years, preferably in the spring.
- Adjust care routines as the weather and lighting conditions change.
Final Thoughts
In conclusion, Norfolk Pines are more than just a houseplant—they’re a connection to the calmness of nature, a statement piece for your home, and a rewarding addition to your indoor garden. With the proper care, these beauties will thrive for years, adding a touch of evergreen serenity to your space.
Please comment below if you’re dealing with Norfolk Pine challenges or want to share your plant-parenting wins. I’d love to hear about your experiences and any tips you might have. After all, we’re all in this plant-loving community together!
References:
6 Air Purifying Houseplants for Improving Your Home’s Indoor Air Quality. https://aplusairconditioning.com/national-gardening-month-6-houseplants-improving-air-quality/
How to Grow and Care for Norfolk Island Pine. https://www.thespruce.com/grow-norfolk-island-pine-indoors-1902627
Thank you for reading this blog post. If you have any questions or comments, please leave them in the Comments section below.
Copyright © 2019. I Don’t Know All The Answers, Nikki Mastro.
All of my photographs and documents are Copyrighted.
No part of this website, including text, photographs, and documents, may be reproduced, stored in a retrieval system, or transmitted in any form or by any means without written permission from the copyright holder. All unauthorized use is strictly prohibited. If you choose to copy or share any information from my site, you must provide a link to the source. I appreciate your cooperation.
For further information concerning “I Don’t Know All The Answers.”
– Website and Blog: https://www.idontknowalltheanswers.com
– Facebook: https://www.facebook.com/Nikki.L.Mastro/
– Instagram: https://www.instagram.com/i_dont_know_all_the_answers/
– Linkedin: https://www.linkedin.com/in/nikki-mastro-05455a3a/
– Youtube Channel: https://www.youtube.com/@idontknowalltheanswers1954

